StorMagic SvHCI: Beginner's Guide
A step-by-step guide for first-time users.
⏱️ Read Time: 20 minutes
What Is SvHCI?
StorMagic SvHCI is the software that runs on your EDC. It lets you create and manage virtual machines: software computers that run inside your physical hardware. You can run multiple virtual machines on your EDC at the same time, each with its own operating system, applications, and network connections.
Everything is managed through a web browser. No special software to install.
SvHCI is the recommended platform for HR-01-2 EDC deployments.
How the EDC Stays Online
Your EDC has two physical compute nodes. Both run at the same time, and every piece of data is copied to both nodes continuously. If one node fails, the other keeps all your virtual machines running without any action from you.
To make this work reliably, the EDC includes a small dedicated device called the witness. Its only job is to act as a tiebreaker. If one node loses contact with the other, the witness confirms whether the node actually failed or just lost the network connection. This prevents both nodes from trying to run independently at the same time.
The witness comes pre-installed on a dedicated device embedded in the EDC, managed by the HiveRadar health monitor. You do not need to configure it.
Before You Start
Make sure you have the following:
| What you need | Where to get it |
|---|---|
| Node management IP address | Provided by your reseller in the deployment documentation |
| Login credentials | Provided by your reseller |
| A laptop connected to the EDC management network | Plug into the management switch or ask your reseller how to connect |
| OS installer file (if setting up a new virtual machine) | Download the ISO file from your OS vendor's website |
| Your network plan (if you need VLANs) | Your internal IT or network team |
Logging In
- Open a web browser on a laptop connected to the EDC management network
- Type
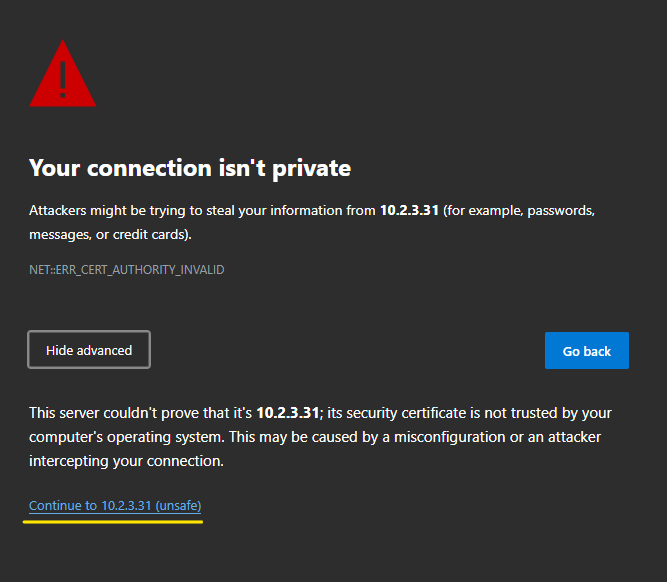
https://<node-management-IP>in the address bar, replacing the placeholder with your actual IP - Your browser will show a security warning about the certificate. This is expected. Click through to proceed.
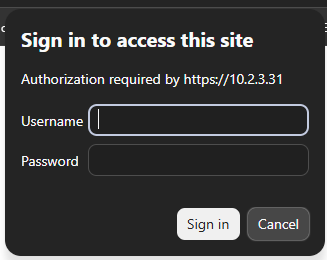
- Log in with the username and password provided by your reseller
Don't know the management IP? See the IP discovery section in the HCI Overview page.
What You're Looking At
When you first log in, you will see the main dashboard. On the left is the Main Menu. This is how you navigate everything.
| Menu item | What it does |
|---|---|
| Home | Dashboard showing the overall status of your system |
| System | Settings: your system name, time, users, and license |
| Network | Where you set up port groups to give VMs network access |
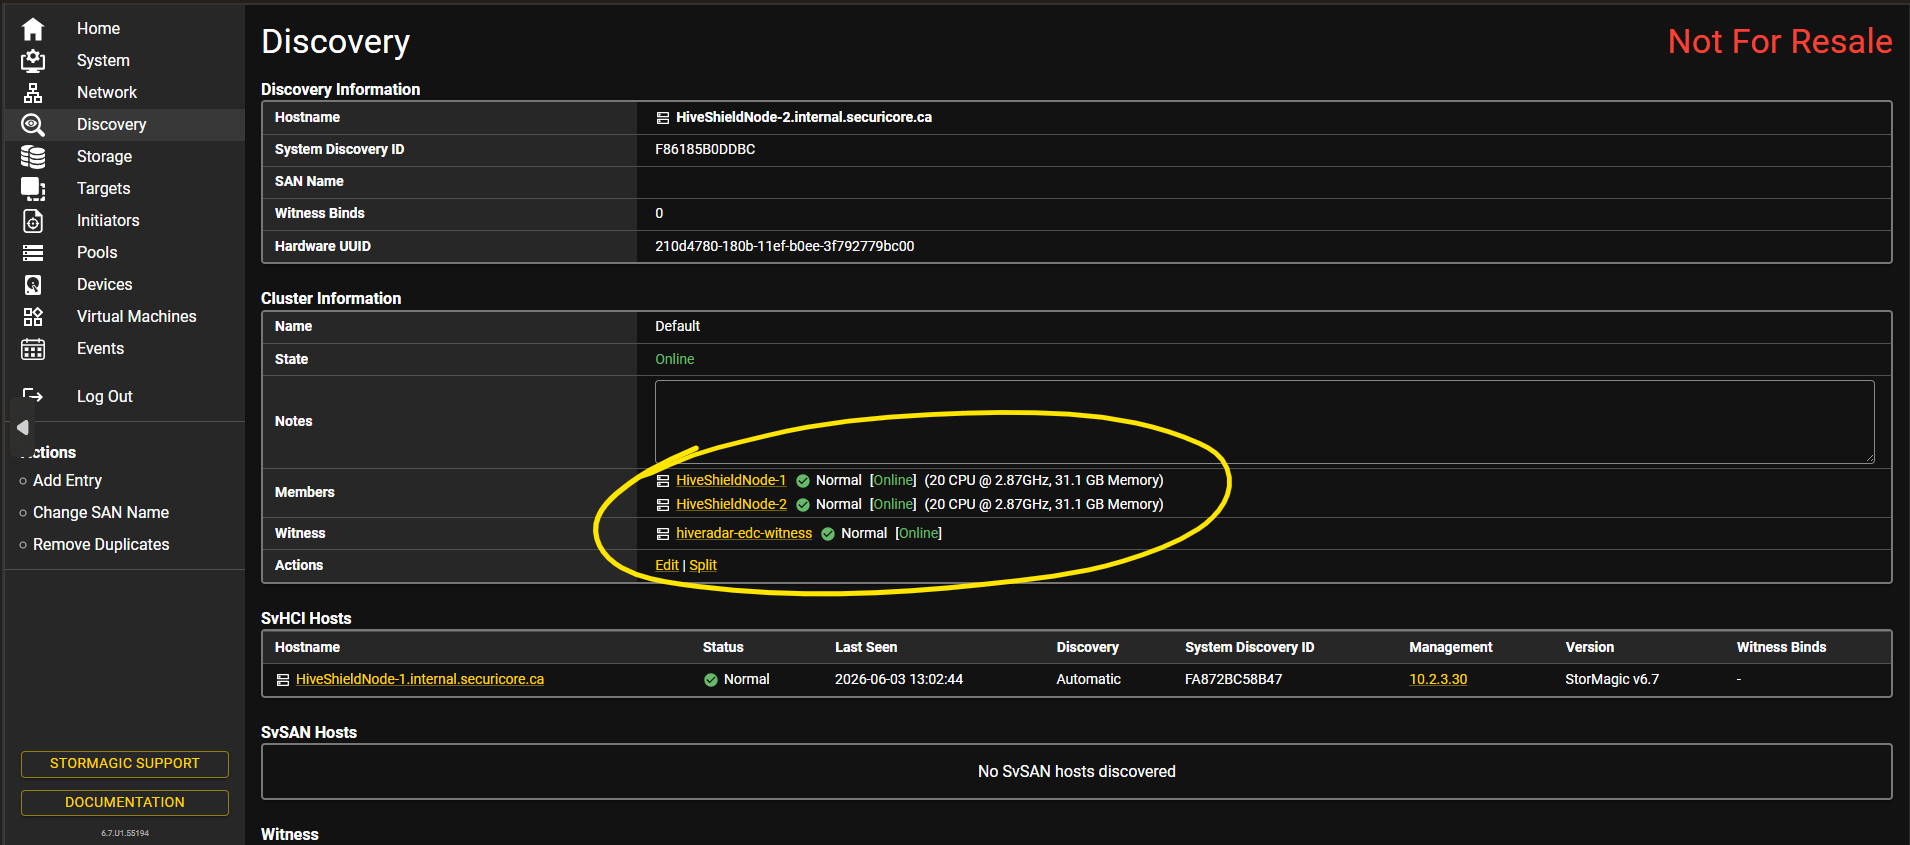
| Discovery | Shows whether both nodes and the witness are healthy |
| Storage | Overview of your storage |
| Targets | Where ISO files (OS installers) are uploaded and stored |
| Initiators | Advanced storage connectivity settings. You do not need this for basic VM setup. |
| Pools | The storage pools your VM disks are built on |
| Devices | The physical drives inside the nodes |
| Virtual Machines | Where you create and manage your VMs |
| Events | A log of everything that has happened on the system |
| Log Out | End your session |
Before doing anything else, go to Discovery and confirm both nodes show as healthy and the witness is connected. If anything shows a problem, contact your reseller before continuing.
Creating a Virtual Machine
This section walks you through creating your first virtual machine. Follow the steps in order.
First, decide which type of VM you need:
- Protected VM
- Non-protected VM
Use this for production workloads.
A protected VM's data is copied to both nodes at all times. If one node fails, the VM keeps running automatically on the other node.
Follow all steps below. Make sure to check the Protected checkbox in Step 3 of the VM creation form.
Use this for testing, development, or temporary workloads.
A non-protected VM's data lives on one node only. If that node fails, the VM goes offline until the node comes back online.
Follow all steps below. Leave the Protected checkbox unchecked in Step 3 of the VM creation form.
Step 1: Set Up a Port Group
Before you can give a VM a network connection, you need to create a port group. A port group is a named network connection point. When you create a VM, you assign it to one or more port groups, and each one becomes a separate network interface inside the VM.
Think of it like a labelled network socket. You can plug a VM into multiple sockets at once.
What VLAN mode should I choose?
| VLAN Mode | What it means | When to use it |
|---|---|---|
| none | The VM connects to the main network on the switch with no VLAN filtering. Any VLAN-tagged traffic the VM sends passes through as-is. | Use this if you are not sure, or if your VM will handle its own network configuration. |
| access | The VM is assigned to one specific VLAN. The switch handles all the VLAN tagging automatically. The VM itself does not need any special network configuration. | Use this when you want the VM on a specific VLAN and want to keep it simple on the VM side. |
Not sure which to pick? If your network team has not given you a VLAN ID, choose none.
If you've worked with VMware: SvHCI port groups work the same way.
Create a port group:
- Select Network from the Main Menu
- Select Create Portgroup from the Actions section
- Enter a Name that describes the network, for example:
Management,Production,Lab - Set the VLAN Mode: choose none if unsure, or access and enter your VLAN ID
- Select Apply
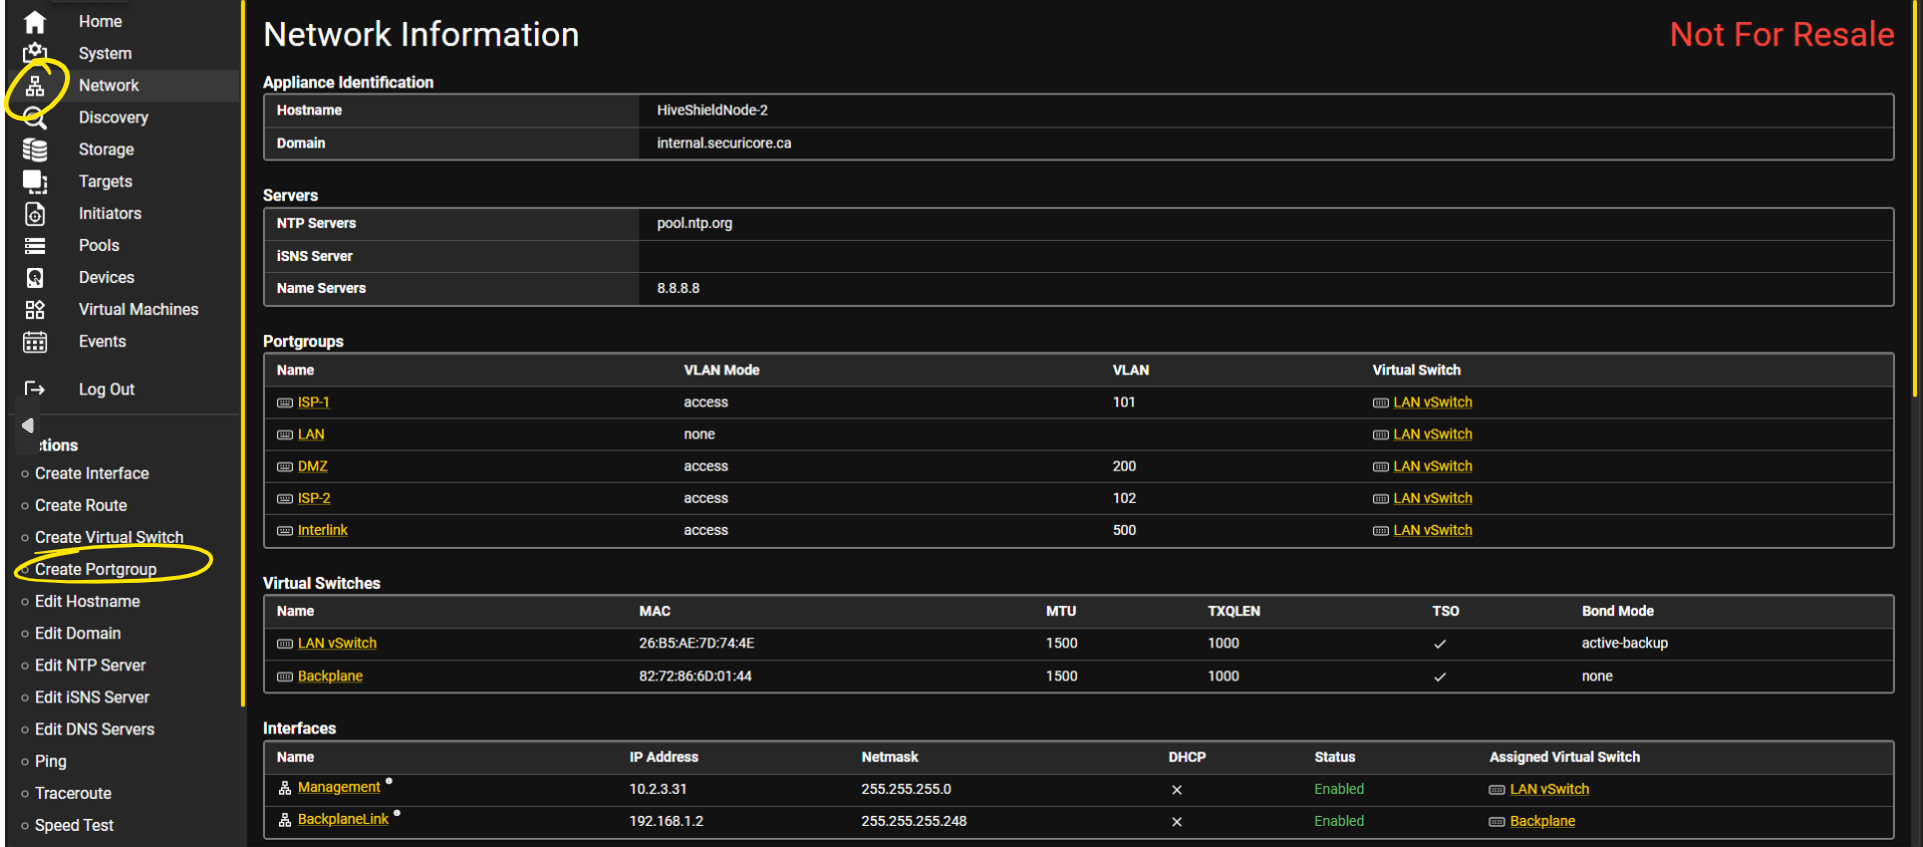
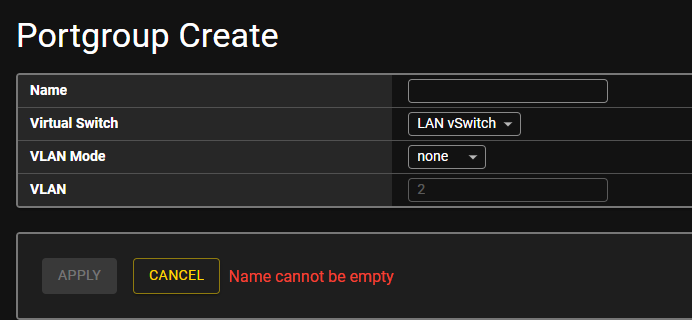
The port group is now ready to use.
Step 2: Upload an OS Installer (ISO)
Skip this step if you are not installing a fresh operating system, for example if you are importing an existing VM instead.
An ISO is a single file that contains an OS installer, the same as a DVD installer but in digital form. You upload it once and can use it to install as many VMs as you need.
- Select Storage from the Main Menu
- In the left sidebar under Actions, select Upload
- Browse to your ISO file and upload it
- Wait for the upload to complete
- The ISO appears in the ISO images section at the top of the Storage screen
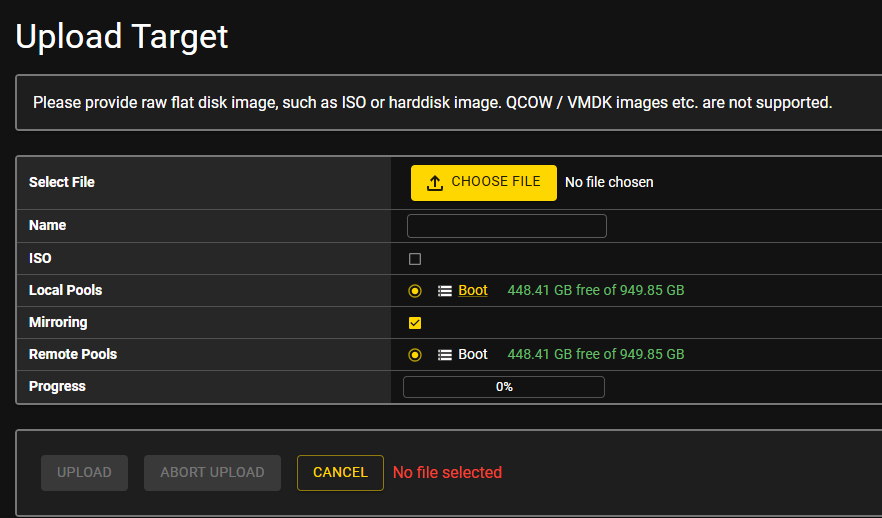
Upload from a machine on the same local network as the EDC where possible. Large ISO files (Windows Server, Ubuntu) can be 5 to 9 GB and will take a long time over a slow or remote connection.
The ISO is now available to attach to a VM.
Step 3: Create the VM
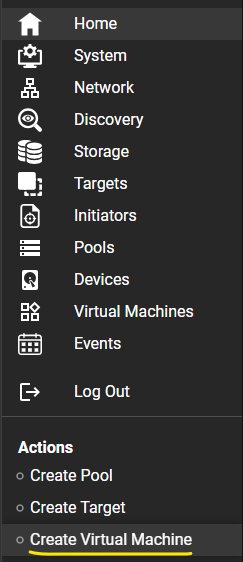
- Select Create Virtual Machine from the Actions section below the Main Menu
-
Enter a Name for the VM. Use something descriptive so you can identify it later.
-
Hardware version: Leave this as Version 1. You do not need to change this.
-
Boot Firmware: Leave this as UEFI. This is correct for any modern operating system (Windows Server 2016 and newer, Ubuntu 18 and newer). Only select BIOS if you are using a very old OS that does not support UEFI. This is rare.
-
Protected: Check this box if this is a production VM. Leave it unchecked for test or temporary VMs.
The box is greyed out? This means your cluster or storage has an issue. Go to Discovery and check that both nodes are healthy before continuing.
-
Memory: Enter how much RAM to give the VM. 4 GB works for most workloads. Check the minimum requirements of the OS you are installing if you are unsure.
-
CPU Type: Leave this as Intel x86-64-v2 (Nehalem). Only change this if you are installing Windows Server 2025 or Red Hat Enterprise Linux 9 or 10, which need Intel x86-64-v3.
-
CPU cores per socket: Start with 2 for most workloads.
-
Keyboard: Select the keyboard layout that matches the keyboard you will use to type in the VM console. If you are not sure, select US English.
-
Add a storage controller: Select Add Controller
- Leave the type as VirtIO. You do not need to change this for most workloads.
- Select Add
-
Add a network connection: Select Add Network
- Model: Leave as VirtIO. Only change to E1000E if you are installing an older version of Windows that does not have VirtIO drivers.
- Port Group: Select the port group you created in Step 1
- Leave Index as 0 and Connected checked
- Select Add
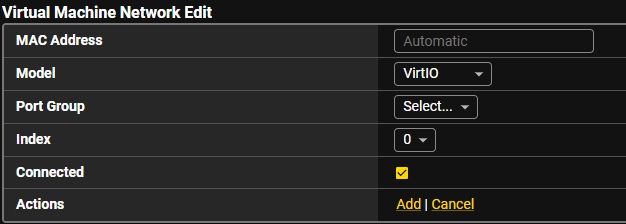
To connect the VM to more than one network, select Add Network again and choose a different port group. Each one will appear as a separate network card inside the VM. You can add up to 4.
- Add a disk: Select Add Disk
- Choice: Select Create to make a new disk
- Name: Give it a simple name, for example
disk-0 - Size: Enter the disk size in GB. Most operating systems need at least 40 GB.
- Pool: Select the right pool based on your VM type:
Select Boot (the available pool). The Protected checkbox you set earlier determines whether the disk is mirrored across both nodes. The pool does not change that.
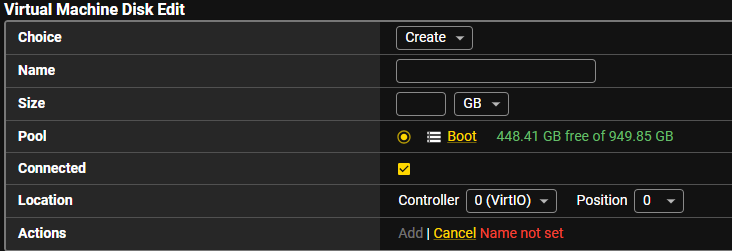
Advanced disk options
- Controller: Leave as the default
- Position: Set to 0 for your first disk. Increase by 1 for each additional disk.
You can add up to 8 disks per VM.
- Select Add
-
Add a CD-ROM (only if you are installing from an ISO): Select Add CDROM
- ISO: Select the ISO you uploaded in Step 2
- Deselect the Ejected checkbox so the ISO loads on first boot
- Select Add
-
Select APPLY to create the VM
-
Your VM now appears in the Virtual Machines screen. If Protected was checked, the Protected column shows a checkmark (✓). Select On from its Actions column to start it.
-
Select VNC to open the console. You will see the OS installer. Follow the on-screen steps to complete the installation.
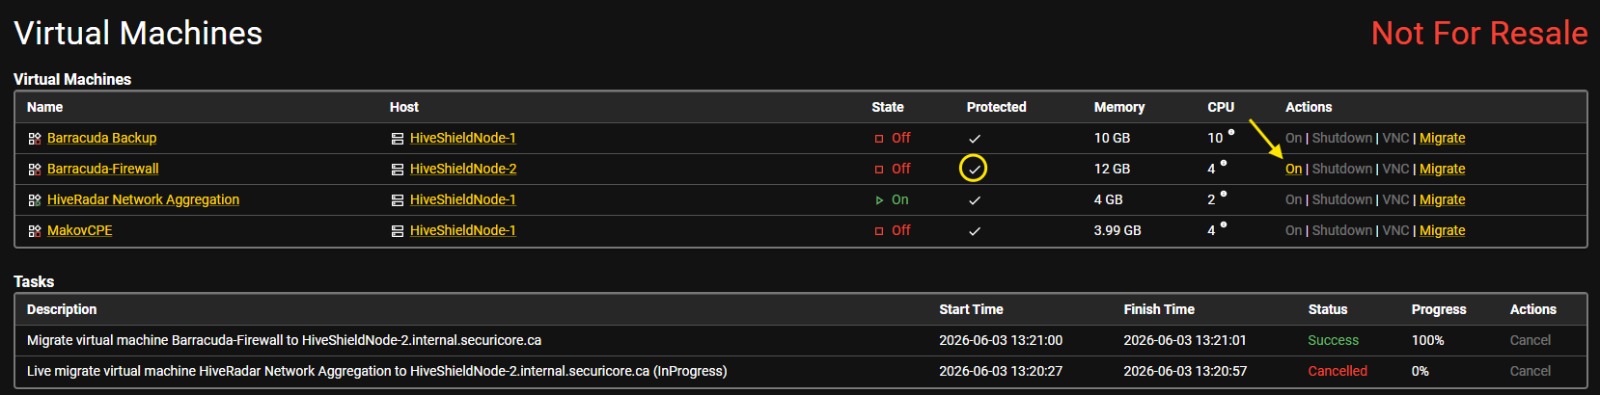
After installation, the ISO stays attached. The EDC boots from the installed disk automatically, so this does not cause a problem. To remove the ISO, edit the VM, go to CD-ROM settings, and check the Ejected checkbox.
Importing an Existing Virtual Machine (OVF/OVA)
If you already have a virtual machine set up in another system (such as VMware or another HCI platform), you can move it to SvHCI without starting from scratch.
VM files exported from other platforms usually come as an .ova file (a single packaged file) or an .ovf file with one or more disk files alongside it.
Coming from VMware? Use the StorMagic VM Import Utility instead of this method. It is purpose-built for VMware migrations and handles the conversion automatically.
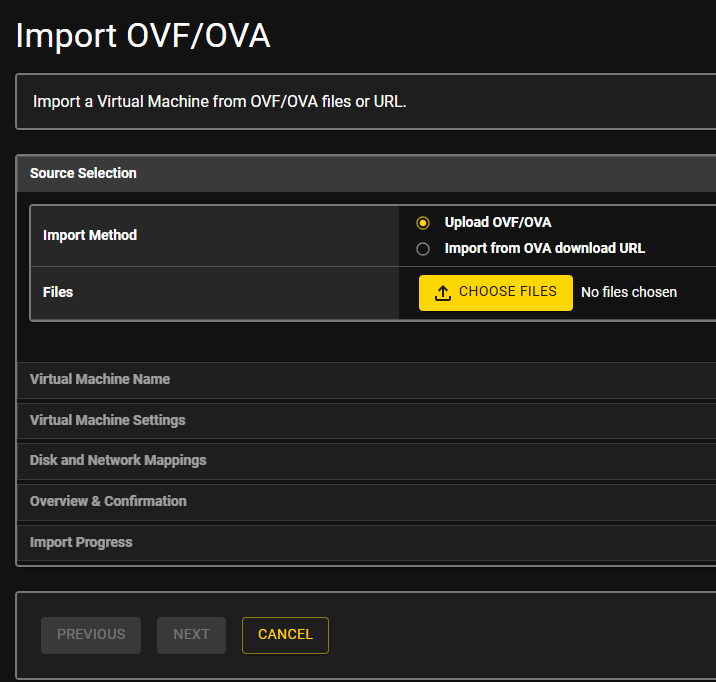
To import an OVF or OVA file:
- Select Virtual Machines from the Main Menu
- In the left sidebar under Actions, select Import OVF/OVA
- Choose where the file is coming from:
- Local file: browse to the
.ovaor.ovffile on your computer - URL: if the file is hosted on a server you can reach from the EDC
- Local file: browse to the
- If importing an
.ovf, also select the disk files that came with it - Enter a name for the VM. Keep it to 27 characters or fewer.
- Choose the storage pool for the VM's disk:
- The pool with mirror or SvSAN in the name = protected VM
- Boot pool + Protected checkbox unchecked = non-protected VM
- Select the port group for the VM's network connection
- Review the summary showing the VM's CPU, memory, disk, and network settings
- Confirm and wait for the import to finish
- Power on the VM and confirm it starts correctly
Name too long: If the VM name is 28 characters or more, the import will fail. Shorten it before trying again.
Network adapters after import: The network adapter order may differ from the original VM. If the VM's networking behaves unexpectedly after import, edit the VM and check the network adapter index settings. The VM must be powered off to make changes.
Troubleshooting
Cannot access the SvHCI management console
Symptoms: Browser times out or shows connection refused at https://<management-IP>
Check:
- Your laptop is connected to the EDC management network, not a different network
- The IP address is correct. Check your reseller documentation or the EnGenius switch DHCP client list.
- Both nodes are powered on and have finished booting. This takes 3 to 5 minutes after power-on.
- You clicked through the certificate warning in your browser
- No firewall on your laptop is blocking the connection on port 443
If it still does not load:
- Connect a monitor and keyboard directly to one of the compute nodes
- Check the IP address shown on the login screen
- Contact your reseller if the system is not responding
One node is showing as offline or unhealthy
Symptoms: The Discovery screen shows one node as offline or in an error state
Check:
- Is the node physically powered on?
- Check the cable connecting the two nodes. Unplug both ends and plug them back in.
- Can you ping the node's management IP from your laptop?
- Check the network switch port the node connects to. Is it active?
Recovery:
- If the node is off, power it back on and wait a few minutes for it to rejoin
- If the node is on but not responding, check all cables and the switch
- Check the Events screen for any error messages
- Contact your reseller if the node does not come back online
The Protected option is greyed out when creating a VM
Symptoms: The Protected checkbox cannot be selected in the VM creation screen
What this means: Protected VMs require both nodes to be healthy and storage to be fully synchronised between them. If either node is offline, or storage is still catching up after a restart, the option is disabled.
Check:
- Go to Discovery and confirm both nodes show as healthy
- Confirm the witness is connected
- Go to Storage and check for any pools showing an error or degraded status
Recovery:
- If a node is offline, bring it back online and wait for the system to synchronise
- Once both nodes and the witness are healthy, the Protected checkbox will become available
OVF/OVA import fails
Symptoms: An error appears during the import process
Common causes:
| What happened | Why | What to do |
|---|---|---|
| Import failed during setup | VM name is 28 characters or more | Shorten the name and try again |
| Import was canceled but leftovers remain | The import was stopped part-way through | Go to Targets and remove any targets that were partially created |
| Network adapters in wrong order after import | The import process does not guarantee adapter order | Edit the VM after import to fix the network adapter settings |
| Performance settings were reset | Some settings are hardware-specific and cannot transfer | Reconfigure any performance settings manually after import |
For VMware source VMs, use the VM Import Utility instead of OVF/OVA import.
VM is not showing as Protected after creation
Symptoms: The VM was created with Protected checked but shows as non-protected in the VM list
Check:
- Are both nodes online and storage fully synchronised? Check Discovery and Storage.
- Was the Protected checkbox checked when the VM was created? Check the Protected column in the Virtual Machines screen. If there is no checkmark, recreate the VM with Protected enabled.
Recovery:
- If storage is still catching up after a node restart, wait for synchronisation to complete
- If the wrong pool was selected, recreate the VM and select the correct pool
Getting Help
If something is not working and you cannot find the answer here:
- Your reseller is your first point of contact. They set up the system and know your specific configuration.
- StorMagic support portal: support.stormagic.com
- StorMagic support email: support@stormagic.com
When contacting support, have the following ready:
- The SvHCI version number (visible in System settings)
- The serial numbers of both nodes (on the hardware label or in System settings)
- A description of the problem and any error messages you saw
- An export of the event log from the Events screen
Related Pages
- HCI Software Overview: Choosing the right HCI platform for your EDC
- Network Configuration: EnGenius switch setup and VLAN configuration
- Initial EDC Setup: First-time setup checklist